Wednesday, June 24, 2020

Become a Zoom Pro: 7 Features You May Not Know

1) Touch up my appearance


After the recent shift to working and studying from home, it’s fair to say that many of us haven’t been putting as much effort into dressing up as we used to. Luckily, for those who might be a little worried about their appearance, especially for those morning meetings, Zoom has a feature called Touch up my appearance. Touch up my appearance is an instant video filter that provides a natural look by smoothing fine lines and eye bags, allowing you to look your best even if you didn't get a great night's sleep.


To enable this feature, go to Settings and click on the Video tab. From here find the option labeled Touch up my appearance and check the box next to it.

2) Mute and unmute using the spacebar


One of the most overlooked features of Zoom is the ability to mute and unmute yourself by pressing the space bar. This is a very handy feature to know and can be a real time-saver, saving you from having to navigate to the mute button every time you want to mute or unmute yourself.

3) React with an emoji


Have you ever been muted but still want a way to express your opinion to the speaker? Zoom’s built-in emoji reactions can be a great solution allowing you to share your thoughts on the topic while muted.


To react during a meeting, click on the Reaction button at the bottom of the screen and select the emoji you want to use. The emoji will be visible for all participants for 5 seconds before disappearing.

4) Keyboard shortcuts


Want a faster way to navigate through Zoom? Learning some of Zoom’s handy keyboard shortcuts can be a big time-saver, especially for those who use Zoom on a regular basis. From taking a screenshot to switching between speaker and galley view, Zoom has a shortcut for almost any situation.


Here are some of the most useful shortcuts:
  • Start/Stop Video (Alt - V)
  • Mute/Unmute My Audio (Alt - A)
  • End Meeting (Alt - Q)

For a full list of shortcuts go to Settings and click on the Keyboard Shortcuts tab.

5) Record transcripts


The recording transcripts feature within Zoom will automatically transcribe the audio from your meeting. This can be great for those who forgot to take notes during a meeting and also allows you to search for keywords and access the video feed for that moment.


6) Hide non-video participants


While in some meetings, especially larger ones, it can be easy for your screen to become cluttered with participants. This can make it difficult to focus on the important participants in the meeting such as the presenters or speakers. A quick and easy way to declutter your screen is to turn off non-video participants. This will tell Zoom to only show you the participants who have their video turned on, although you will still be able to hear participants who do not have their video turned on.

To enable this feature, go to Settings and click on the Video tab. From here find the option labeled Hide non-video participants and check the box next to it.

7) Change your background


Tired of having the same old background during your Zoom calls? Would you rather be taking your meetings on the beach or on top of a mountain? Although we can not teleport you to your favorite destination a virtual background is the next best thing and allows you to upload an image of your choice to be displayed as your background during Zoom calls.


To enable this feature, go to Settings and click on the Virtual Background tab. From here you can either select one of Zoom's default backgrounds or upload your own.

Note: Your computer must meet Zoom's system requirements to be able to use this feature. You can view these requirements on Zoom's website here.

What's next?


Want to test your new skills and start an ESU virtual event? Get started here.

Taylor Nelson
Student Media Producer
Web and Digital Strategies

Monday, June 15, 2020

Microsoft Teams - Tips + Tricks

Microsoft Teams has been an increasingly popular instant messaging service provided by Microsoft in recent times. Everyone has probably had some experiencing using Microsoft Teams, and if you haven't, it's time to hop onto the train. We're going to cover some less commonly known features of Microsoft Teams today, and hopefully you'll be able to take advantage of some of these features!

'Do Not Disturb' Mode

Have you been in a meeting recently where someone's sound notifications for Teams are popping off? Have this happened to you? Teams has a common instant messaging feature where, when you receive a new message, it plays a small 'ding' sound to notify you of it. Although this is handy most of the time, there are times when you don't want to hear this notification sound. For example, when you are in a meeting or giving a presentation. That's where 'Do Not Disturb' mode comes into play. If you open the Teams application, and select your initials in the top right corner, there is an option to change your availability. If you have a meeting scheduled on your Outlook calendar during a specific time, Teams will automatically change your status to 'Busy', but that doesn't do anything about the notification sounds. You will need to navigate there manually and select 'Do not disturb'. This guarantees that any new messages will be silent until you turn your availability back to anything else. Below is a screenshot of how exactly to change your availability within the Teams application.
Screenshot of availability selection on Microsoft Teams
Availability Selection

Status Message

About to go on your lunch break? Need to step away from your computer for 15 minutes? Have a quick errand to run? Be sure to set your status message to reflect that! This allows your colleagues, and anyone on campus trying to message you on Teams, to know you are currently away from your keyboard. Teams also gives the option of setting timers for status messages, which is useful for everyone. For example, you can set your status to 'Taking lunch' for exactly one hour, and then it will automatically reset your status message. This can clear up any frustrations of delayed messages, and it's simply best practices to let everyone know the status of your availability. Below is a screenshot of what it looks like when messaging someone with a set status message.
Set Status Message

Sending Files + OneDrive

If you use Teams on the daily, it's quite common to send files back and forth through Teams. It's very handy and quick to send files. But, the issue of files being 'lost' can raise concerns. For example, if you sent a file months ago to someone and can't remember who you sent it to, what do you do? You'll probably search through all of your Teams' contacts and attempt to recover it. We can all agree that you should have stored it in OneDrive in the first place, right? Jokes aside, Teams does this for you! When you share files using the Microsoft Teams application, it automatically stores them into a OneDrive folder under your files. Below is a screenshot of what the folder looks like under 'My Files' in OneDrive.


And then, just like with any OneDrive folder, you can sort and filter through them to help you find your 'lost' files!


App Integrations

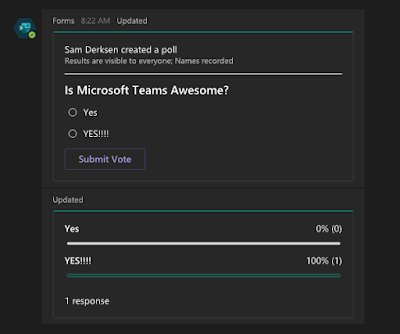
Teams allows you to integrate existing applications into your chats. This is not only much more fun than plain text, but it allows for more interactive conversations between you and your colleagues. You can check out which applications you can integrate into your Teams client by selecting 'Apps' in the bottom left of your client. A few examples that I'll give here would be Microsoft Forms, Planner, Weather, OneNote, and SharePoint. Be sure to check them out and see if any of the available application integrations can ease your daily workflow! Below is an example of a sample question I made with Microsoft Forms in one of my existing chats.
Microsoft Forms 'Poll'


I hope that some of you are able to utilize some of these Tips + Tricks into your daily workflow using Microsoft Teams. Be sure to poke around and Teams and explore the many possibilities of its uses.


Sam Derksen
Web Developer
Web and Digital Strategies

Wednesday, June 10, 2020

How to Track Down Missing Emails?

As communication technology has evolved over the years, email has rapidly grown in popularity and is now undoubtedly one of the most widely used methods of online communication. Although most people have a general understanding of how email services work and can perform the basics such as sending, forwarding, and replying with relative ease, there are still many features of email services that cause confusion. Today we will delve into some of these features, explaining how some of the different types of mailboxes work and where to look when you’re expecting an email but haven't received it.

Inbox

This is the main mailbox where all of your emails that haven’t been flagged as spam or junk end up. This mailbox primarily contains all of your important emails and should be the first place to look when checking your email. Unfortunately, some legitimate emails are accidentally marked as spam or junk by accident so they may not always end up in your inbox.

Junk/Spam

The junk mail folder or spam folder is used to store unwanted emails, preventing them from making it to the user’s main inbox. This helps decrease the volume of emails that a user has to look through, since some users may receive hundreds of emails on a daily basis with only a handful being legitimate. As previously mentioned, the systems used to detect junk mail are not always perfect so some legitimate emails may be marked as spam and on the other hand, some unwanted emails can slip through the cracks and enter your main inbox. Because of this, it is important to check your junk or spam folders on a regular basis, especially when you are expecting an email but can not find it in your inbox.

Clutter

Clutter is an email sorting system used by Microsoft Outlook. The main purpose of clutter is to distinguish between high and low priority emails so you can better identify important messages and reply to them sooner. Clutter uses an artificial intelligence system that analyzes your habits and behavior when using Outlook to get a better understanding of the types of emails you like to see and the ones you tend to ignore.

Unfortunately, the clutter feature has been discontinued by Outlook although some users may still have this feature. If you do have this feature, clutter is another place to check on a regular basis since important emails can also end up here by accident.

To enable the clutter folder within Outlook check "Separate items identified as clutter" and click “Save”.

Antispam

Antispam is a service similar to junk/spam and can be seen as another layer of defense, filtering out unwanted emails. Also similar to junk/spam, antispam is not always perfect and can filter out important emails by accident stopping them from reaching your main inbox. Because of this, it is very important to check your antispam on a regular basis to make sure you’re not missing any legitimate emails.

To access antispam head to antispam.emporia.edu and login with your ESU username and password.


Taylor Nelson
Student Media Producer
Web and Digital Strategies


Tuesday, June 9, 2020

Why Is Email Important?

Outlook iconAlthough many of us enjoyed the interaction between each other in the office, there has never been a better opportunity to utilize technologies like email. Email isn't new by any means, but utilizing it as a primary communication source might be for some people. It's also worth noting that email is the primary official means of communication for Emporia State University. In a world where no physical meetings are taking place, email usage has increased, and rightly so!

There are many benefits to emailing people for communication methods, especially if you're using Outlook for Office 365. Your emails between colleagues are documented and are readily available by a quick search for a word, person, or subject. This potentially eliminates any miscommunication issues that you could be having with colleagues. Because of this feature, it's important to remember to write well thought out emails. Be concise with what you are trying to convey and the digital workforce will be thankful! Another benefit is simply keeping everyone in the loop. Being able to CC your colleagues/boss into your emails gives them a way to keep track of what's going on with certain projects/tasks. One could also argue that email is more secure than the word of mouth communication method. Outlook for Office 365 allows you to 'Encrypt' an email with various options depending on the confidentiality of the email's content. Be sure to learn more about the 'Encrypt' feature by following this link.

Hopefully this blog provides some insight to why email has become so important in our everyday workflows. Although this blog post is generally targeted at faculty and staff, it also applies to students with their student Gmail accounts. Stay on top of your inbox and your colleagues will take notice!

Sam Derksen
Web Developer
Web and Digital Strategies
Friday, June 5, 2020

Outlook: Focused Inbox vs. Normal Inbox

Microsoft Outlook app updates on Android phones and tablets with ...

Do you like having your inbox organized, clean, and know exactly where to find them?

Using your Outlook email is something that is an everyday task for employees and faculty of our university. Gmail and Outlook are both of the email providers that Emporia State uses, but the difference between the two stands out with Outlook.

Outlook has a bit different view when you get to your home screen on your email. Outlook offers different locations for your emails to go without having to leave your Inbox tab. While some users have "Clutter" as a folder choice instead of the normal options being "Focused" and "Other". Focused and Other are the two tabs that are going to be within your inbox tab when using Microsoft365, Exchange, and Outlook.com. The Focused tab is where your more important emails will be located, giving you fast access to your everyday interactions. The Other tab is where you can place your less necessary emails like subscriptions, shopping ads, donation banks, etc. This gives the user a more clean and organized user face for them to utilize. Leaving all of your emails organized but still keeping all of them easily accessible.

When using Outlook on a Windows device, you will need to select that you want your Focused inbox visible. From there you will be able to go through your emails and either move them to the Focused inbox or the Other inbox. 

Using Outlook.com on a device, you will need to go to settings and turn on the "Focused Inbox". This will refresh and you will be able to organize your emails into which category you want them to be in.

If you are using Outlook, Microsoft365, or Exchange, there are step-by-step instructions on how to get your email inbox looking clean and organized while still being user friendly found here.

Questions and concerns can also be answered by contacting the IT Help Desk.
Stay healthy Hornets!

Dakota Taylor
Social Media Student Assistant
Web & Digital Strategies